By holding down alt, then typing numbers on the number pad (right of the keyboard) you can create special characters. If you hold down alt, then press 1, then let go, you got the ascii character 1. You try some randomn numbers. This goes all the way up to 255. Open a dos prompt, and type md (alt+1+9+4)someword. md is the dos command to make a directoy, now try and open the directory in Windows, you can't. To open it, type ren (alt+1+9+4)someword someword (ren is the dos command to rename).
Saturday, December 15, 2007
Create Ringtones Online
Cellsea is a web based Ringtone maker. Using their cool service you can quickly create ringtones for yourself by uploading your audio files (MP3, MIDI, M4A and AAC are supported). If your lazy to upload, they will get the audio file for your from a remote URL or even a Google Search.
After uploading, you can crop your audio files and listen to preview before sending it to production. The ringtone will be saved to Dashboard, you can either download it to your machine and then upload it to your cellphone over Bluetooth, Data Cable or IR. An simpler alternative would be point your browser to wap.cellsea.com and then entering your download code.

Note: The maximum upload size for audio files is just 5 MB, since most MP3s thesedays are under 5 MB, this shouldn’t be an issue.
Labels:
Mobile Phones Tips
![]()
Find the IP address of the sender in Gmail, Yahoo! mail or Hotmail
When you receive an email, you receive more than just the message. The email comes with headers that carry important information that can tell where the email was sent from and possibly who sent it. For that, you would need to find the IP address of the sender. The tutorial below can help you find the IP address of the sender. Note that this will not work if the sender uses anonymous proxy servers.
Finding IP address in Gmail
1. Log into your Gmail account with your username and password.
2. Open the mail.
3. To display the headers,
* Click on More options corresponding to that thread. You should get a bunch of links.
* Click on Show original.
4. You should get headers like this:
Gmail headers : name
Look for Received: from followed by a few hostnames and an IP address between square brackets. In this case, it is - 65.119.112.245. That is be the IP address of the sender!
5. Track the IP address of the sender.
Finding IP address in Yahoo! Mail
1. Log into your Yahoo! mail with your username and password.
2. Click on Inbox or whichever folder you have stored your mail.
3. Open the mail.
4. If you do not see the headers above the mail message, your headers are not displayed. To display the headers,
* Click on Options on the top-right corner.
* In the Mail Options page, click on General Preferences.
* Scroll down to Messages where you have the Headers option.
* Make sure that Show all headers on incoming messages is selected.
* Click on the Save button.
* Go back to the mails and open that mail.
5. You should see similar headers like this:
Yahoo! headers : name
Look for Received: from followed by the IP address between square brackets [ ]. Here, it is 202.65.138.109. That is be the IP address of the sender!
6. Track the IP address of the sender.
Finding IP address in Hotmail
1. Log into your Hotmail account with your username and password.
2. Click on the Mail tab on the top.
3. Open the mail.
4. If you do not see the headers above the mail message, your headers are not displayed. To display the headers,
* Click on Options on the top-right corner.
* In the Mail Options page, click on Mail Display Settings.
* In Message Headers, make sure Advanced option is checked.
* Click on Ok button.
* Go back to the mails and open that mail.
5. If you find a header with X-Originating-IP: followed by an IP address, that is the sender's IP address Hotmail headers : name, In this case the IP address of the sender is [68.34.60.59]. Jump to step 9.
6. If you find a header with Received: from followed by a Gmail proxy like this
Hotmail headers : name
Look for Received: from followed by IP address within square brackets[].
In this case, the IP address of the sender is [69.140.7.58]. Jump to step 9.
7. Or else if you have headers like this
Hotmail headers : name
Look for Received: from followed by IP address within square brackets[].
In this case, the IP address of the sender is [61.83.145.129] (Spam mail). Jump to step 9.
8. * If you have multiple Received: from headers, eliminate the ones that have proxy.anyknownserver.com.
9. Track the IP address of the sender.
Labels:
Internet Tips
![]()
Speed up your internet by 20%
Microsoft reserves 20% of your available bandwidth for their own purposes like Windows Updates and interrogating your PC etc.
You can get it back:
Click Start then Run and type "gpedit.msc" without quotes. This opens the group policy editor. Then go to:
Local Computer Policy>Computer Configuration>Administrative Templates>Network>QOS Packet Scheduler>Limit Reservable Bandwidth.
Double click on Limit Reservable bandwidth. It will say it is not configured, but the truth is under the 'Explain' tab i.e."By default, the Packet Scheduler limits the system to 20 percent of the bandwidth of a connection, but you can use this setting to override the default."So the trick is to ENABLE reservable bandwidth, then set it to ZERO. This will allow the system to reserve nothing, rather than the default 20%.It works on Win 2000 as well.
Labels:
Internet Tips
![]()
Secret Codes of Nokia 5110
WARNING :
Using secret codes may be harmful to your phone and result in disabling or worse. One of our users had that bad experience.
IEMI
If you need to know the IMEI code of your phone, simply press:
* # 06 #
To get additional information from your phone you can use the so called "warranty code", try typing:
*#92702689#(= *#war0anty#).
Now you are in service menu where you'll find:
1 IMEI (International Mobile Equipment Identification)
2 Made MM/YY (date of production of the phone mm/yy)
3 Purchasing Date (here you can enter the date of purchase. If you enter an incorrect date, you cannot correct it later !
4 Repaired (date of repair, if there was one)
5 Transfer user data?
*3370# EFR will be activated after a reboot of the phone ( consumes more power )
#3370# EFR will be switched off after a reboot of the phone.
*4720# Half Rate coded will be activated after a reboot of the phone ( better standby time )
#4720# Half Rate coded will be de-activated after a reboot of the phone
If you press the "Power on" button for a short moment, the menu with the profiles is shown on the display.
If you press one more time, the mobile turns itself off.
You can use the up and down cursor keys to scroll and enable a different alert setting.
Labels:
Mobile Phones Tips
![]()
Secret Codes of Nokia 8810/8850/8210
WARNING:
Using secret codes may be harmful to your phone and result in disabling or worse. One of our users had that bad experience.
IMEI number
*#06#
Software Version
*#0000#
1st Line - Software Version
2nd Line - Date of Software release
3rd Line - Phone Type.
Serial Number
*#92702689#
1st Screen - Date of phone manufacture
2nd Screen - Serial #, IMEI
3rd Screen - Purchasing date
4th Screen - Last Repair Date.
Labels:
Mobile Phones Tips
![]()
Secret Codes of Nokia 6110/6150
WARNING:
Using secret codes may be harmful to your phone and result in disabling or worse. One of our users had that bad experience.
IMEI number
*#06#
Software Version
*#0000#
1st Line - Software Version
2nd Line - Date of Software release
3rd Line - Phone Type.
Serial Number
*#92702689#
1st Screen - Date of phone manufacture
2nd Screen - Serial #, IMEI
3rd Screen - Purchasing date
4th Screen - Last Repair Date.
Labels:
Mobile Phones Tips
![]()
Friday, December 14, 2007
Get rid of Shortcut Arrow from Desktop Icons
Have you ever noticed shortcut icons in desktop ? It has an arrow in the corner of each icon. Today’s tips will let you remove it completely. OK, let you follow the steps.
1. Open the Registry Editor program by running regedit, click Start > Run and type regedit then press Enter.
2. Find the key path.
HKEY_CLASSES_ROOT\lnkfile
3. Click on the lnkfile folder, you will see IsShortcut key in the right page like the picture below.
4. Right click on IsShortcut and choose Delete. Click Yes button.
5. Log off and then Log on Windows XP again.
6. Now the shortcut arrows are disappeared.
Labels:
Computer Tips
![]()
Hide specific Drives
This tutorial illustrates how to hide and show your computer drives from Windows XP. You can hide or show as you want both drives in your computer and drives in the computer network. This way can be safe for data in your computer and prevent others from accessing to your drives that may contain important information. This example I will hide drive D and you can apply this method to another drive you want, just change a value that I will explain “how to” in detail. Let you hide drives now.
1. Access to the Registry Editor program, running regedit.
2. Find the path like below,
HKEY_CURRENT_USER>Software>Microsoft>Windows>CurrentVersion>Policies>Explorer
3. Right click on the Explorer folder and select New > DWORD Value.
4. Name the registry NoDrives.

5. Double click on NoDrives which is in the right page.
6. In the DWORD Value window, select Decimal.

7. In this case I want to hide drive D, so I must fill 8 in Value data. The number you filled varies with drive you want it to be hidden. If you want to hide the other drives, you must put the drive-related number like below,
Note :
A=1, B=2, C=4, D=8, E=16, F=32, G=64, H=128, I=256, J=512, K=1024, L=2048, M=4096, N=8192, O=16384, P=32768, Q=65536, R=131072, S=262144, T=524288, U=1048576, V=2097152, W=4194304, X=8388608, Y=16777216, Z=33554432, All drive=67108863
For example, I can hide drive J only if I put the number 512 under selecting Decimal. What to do in case I prefer to hide more than one drive ? That is easy just plus the numbers. To illustrate, I want to hide drive C and E so I put the result number of 4 plus 16 that is 20.
8. Click OK button and close the Registry Editor program.
9. Log off and Log on your computer. Finish !
Labels:
Computer Tips
![]()
Thursday, November 22, 2007
How to Create a Control Panel components Desktop Shortcut
Control Panel menu in Windows XP has many components, such as User Accounts, Add/remove programs, Security Center, and many more. Now, the question is, how to create a desktop shortcut for the componenets? If you find yourself using any of these frequently, and you want to access them from the desktop, you should be create a shortcut, but how?
Follow this simple step: First, go to this directory ---> \WINDOWS\System32, and find these files:
appwiz.cpl -----> Add/Remove Programs
desk.cpl -------> Display Properties
firewall.cpl ---> Firewall Settings
inetcpl.cpl ----> Internet Options
mmsys.cpl -----> Sound and Audio
ncpa.cpl ------> Network Connections
nusrmgr.cpl ----> User Accounts
powercfg.cpl ---> Power Options
sysdm.cpl ------> System Properties
wscui.cpl ------> Security Center
wuaucpl.cpl ----> Automatic Updates Configuration
Those are control panel components files. To create the shortcut, you just right click the files, and then choose Send To ---> Desktop (Create Shortcut), now, in your desktop was added a shortcut that refer to control panel components you have choosen. If you want, you can change the icon of the shortcut with windows standard icon or the icon you were created...
Labels:
Computer Tips
![]()
Removing Properties Menu on "My Computer"
"My Computer" context menu (will be appear when we pushed right click of "My Computer"), by default, will shown properties menu. As we known, in the properties menu of "My Computer", there are some important setting for computer. I will tell you how to make the properties menu disappear from "My Computer" context menu. These are the instruction you can do:
Open Registry Editor by click (Start > Run), then type regedit. Find the following key on your registry editor:
HKEY_CURRENT_USER>Software>Microsoft>Windows>CurrentVersion>Policies>Explorer
Then create new DWORD Value on the key. Then give the value name by NoPropertiesMyComputer. Double click the value, and set the data value by 1. Close the registry editor. Logout from your account or restart your PC to take the effect. Now when you log in again, there isn't properties on "My Computer" Context Menu.
Hope this could help you!!!
Labels:
Computer Tips
![]()
Blocking Application to Prevent from Execution
Now I will give you a trick, that's blocking application to restrict it to execution. This is an useful trick I think to System Administrator or who have a PC that they want to protect their privacy...
Open your registry editor, then find the following key:
HKEY_CURRENT_USER>Software>Microsoft>Windows>CurrentVersion>Policies>Explorer
If you have found the key, add new DWORD Value and rename it to be DisallowRun. Double click the value and set data value to be 1. Then create new subkey under Explorer key, so the complete key will be like this:
HKEY_CURRENT_USER>Software>Microsoft>Windows>CurrentVersion>Policies>Explorer> DisallowRun
On DisallowRun key, create new String Value, and rename it to be (example: application1). Double click the value and set the data value by application that you want to block. Example winamp.exe, cmd.exe, or regedit.exe. Close your registry editor. Logout or restart PC to take the effect.
![]()
Friday, November 9, 2007
What is herbalism?
Although it may sound a bit primitive, it forms the basis of modern pharmaceutical medicine in many ways.
Often considered and derided as a form of folk medicine, herbalism is something you, I and everyone generally practices whether we realize it or not. It is simply the use of certain plants to relieve a particular ailment. When you take aspirin for a headache, you are essentially practicing herbalism in a sense. Why? Aspirin comes from the inner bark of the Willow tree. Obviously, it does not come in the form of a tablet, but there is no denying the relief you obtain from taking it is from the plant derivative of that bark.
While it is true that most remedies come from natural sources, the modern definition of herbalism is much more restrictive than what I have suggested to this point. It is more about the direct rendering of herbs to a medicinal form where industrial manufacturer of pills is not involved.
This form of herbalism has a long history. From 3000 BC, we have records of Summerians using thyme to treat ailments. The first herbalism book is believed to be one found in China and dating from 2700 BC. This book is of great interest and importance. Why? It listed over 365 herbs and their medicinal properties. One was Ma Huang, which you probably know better today as Ephedrine.
The popularity of herbalism cannot be understated. From the Greeks to the Romans to the Chineses and beyond, herbalism formed the basis of medicine through much of the world. It was only in the 17th century that it began to lose its dominant position as modern medicine slowly started to create new forms of treatment and distractions of plant medicinal properties into hybrid medications.
Does this mean herbalism is dead or should be avoided as a form of medicinal treatment these days? Of course not. Pharmaceutical companies spend vast amounts of money sending people into the rainforests for a reason. They are looking for that next great drug that will revolutionize the world, the next aspirin if you will.
On a more practical level, herbalism has a definite place in your daily life. Herbal medicines tend to be better for you than modern alternatives because they do not contain the additives you find with pharmaceuticals. This makes them better for you, but also easier to take as they are often mixed with teas and so on.
Is herbalism for you? Only you can answer that. Just understand that it herbalism is not some extreme fad or something weird. It formed the basis of medicine in our world for such a long period of time that one must wonder how different the world would look today had it not been discovered.
Labels:
Health
![]()
10 Tips That Helped You Lose Weight
Someone recently asked me what were the most important things I learned about losing weight during the time I lost 48lbs (22kg). In response I came up with 10 things that I felt were crucial to my success and could help anyone, no matter which diet they chose to follow...
1. Lose weight slowly (1 or 2 lbs per week). Any more than this can cause you to have a "haggard" look when you have reached your ideal weight (Because of the elastic nature of your skin). Losing too much too quickly can also cause you serious health problems.
2. Consistency. Your weight and general health will reflect what you do and eat most of the time.
3. Exercise burns fat quickly and gives you energy. There seem to be many different opinions about whether you need to exercise to lose weight or just change your diet. I believe you need to do both for many reasons and the main two for me are: Number one, it makes you feel great! and number two, it allows to cheat more than you would be able to if you didn't exercise (think chocolate covered energy bars!)
4. Muscle building. I don't mean body building. Your muscles use energy all day so the bigger they are the more energy they need and the less energy gets stored as fat. Just doing small amounts of weight training can make a big difference (especially for women).
5. Metabolic rate. Raising your metabolic rate will use energy which either burns fat or stops fat being stored. Exercise will raise you metabolic rate and so will spicy foods. For instance, I have found adding mustard to food helps me.
6. Planning. Plan what you are going to eat at least a week in advance. This makes sure you stick to the diet and don't accidentally eat the wrong thing. If you find it difficult to plan or just don't have the time try using an online service.
7. Eat regularly and often. Always have breakfast, lunch and dinner - every day. If possible eat 5 times a day, a small snack between breakfast and lunch and another one between lunch and dinner. Each time you eat you raise your metabolic rate - see number 5.
8. Some food should not be mixed. Mix meat and/or diary products (such as cheese) with vegetables and never with rice or pasta or potatoes. For example, at parties if you see a buffet only eat the meat and cheese and vegetables or only eat the pasta and rice. Mixing the wrong foods is worse that eating too much.
9. Drink plenty of water. Staying hydrated all day helps your general fitness and health which is particularly important when exercising regularly and burning fat.
10. Listen to your body. Your body will let you know how it is doing and what it needs. For example, your stomach produces the same chemicals as your brain when reacting to things. The only difference between the two is that your stomach has not learned to doubt itself!
These are the things that helped me and I hope you find something in here to help you to. I am not a doctor and this article is for informational purposes only. You should always consult your doctor for your dietary and health choices.
Source : www.diettips.net
Labels:
Health
![]()
Friday, November 2, 2007
Speed up Vista Start Menu Search By Limiting Results
The Windows Vista start menu search box is one of my favorite features in Vista, but searching can be pretty slow if you have a lot of personal files, because by default the start menu search also searches files, windows contacts, windows mail, history, and favorites.
You can customize the search results returned in the Start menu search box to only return the results that you want. I personally only want to use the start menu search to pull up applications, so I disabled everything else.
To configure this setting, right click on the Start button and select Properties. Click the Customize button, and you can scroll down to the Search checkboxes. Here's the screen with my settings:

For best results, change the Search files radio button to "Don't search for files". The start menu is too small to find files anyway. This will speed up searching immensely.
Here's the details on what the other options do:
- Search - Should disable the search entirely, but doesn't seem to remove the search box. I left this enabled.
- Search communications - Disables searching through emails and contacts. As far as I can tell, it's only Windows Mail and Windows Contacts right now. I assume other applications will eventually be included here. I disabled this since I don't use either product.
- Search favorites and history - Searches through your IE favorites and history. Perhaps it will also search a future version of firefox. I disabled this since I use Firefox.
- Search Files - You can change this to search all files, or just your home directory. Or disable entirely for speed.
- Search Programs - Searches through the start menu and applications.
Labels:
Internet Tips
![]()
Use Hotmail from Microsoft Outlook
If you are still using Hotmail but would prefer to access your email from a desktop client, then you might be interested to know that Microsoft has released a connector that will allow you to send and receive Hotmail or Office Live Mail through Outlook 2003 or 2007.
This is especially helpful for those of us that maintain a hotmail account but don't like to ever check it because we don't use it all that often.
Installation
Make sure that Outlook is closed, and then download and install the Microsoft Office Outlook Connector. Open Outlook and you'll immediately be prompted with the settings dialog.
Enter in your account details into this screen, and then close the dialog. You'll be prompted to restart Outlook again.

Once you've restarted, you'll now see your Hotmail account in the list of mail accounts, and you can send/receive to download your messages.

If you want to send email with the hotmail account, you'll notice a new drop-down for Account, which will let you switch the account you are sending the email as.

Hopefully this will save you some of the pain of the slow-loading hotmail website.
Labels:
Internet Tips
![]()
Resize Picture Attachments in Outlook 2007
Those who are familiar with resizing picture attachments in Outlook 2003 might wonder where on earth they hid this feature in Outlook 2007 - at first glance, it seems like they removed it completely, when in reality they buried it in the Ribbon.
Resizing picture attachments before they go out is one way to be nice to the people you are sending files to… there's really no reason to send emails with gigantic picture files when the other person just wants to see the picture. It's also easier than resizing them before sending.
On the Ribbon select the Insert tab and click Attach File.

Windows Explorer opens up. Select and double click the picture you want to send in your email. *Note: You can also drag and drop the picture into your email message.

Now that you have the picture attached in your message click the Include Dialog Box Launcher (Yes really is the official name for this little icon). Look where the mouse is in the following screenshot… yes, you have to click that tiny little icon.

Once you click that icon, the "Attachment Options" panel will pop up on the right hand side of your window. In the Picture Options section, you can resize the attached picture automatically to one of the pre-set sizes.

Notice especially the checkbox for "Show when attaching files". If you check this, then the next time you attach a file, this side panel will show up the next time without having to do anything extra.
This comes in extremely useful when sending pictures that have not been resized, cropped, or scaled down from the original size. As picture files can get quite large this allows you to send them as a reasonable sized attachment.
Labels:
Internet Tips
![]()
Customize Windows Vista Logon Screen
For those of us looking to customize the Windows Vista UI experience, there's nothing more annoying than seeing the default logon screen every time you start up your computer, or when you lock your workstation. Thankfully the nice folks at Stardock have created a free utility to replace the logon screen with any wallpaper you choose.
All you have to do is download and install the utility, and click the apply button to immediately see the changes. (It will lock your computer to show you, so you'll have to use your password to unlock it)

The utility is remarkably easy to use, just click on an entry in the list, and use the Apply button to select it. The download button will take you to the directory of logon screens on WinCustomize.

You can also click the Create button and choose any image you want. For instance, if you wanted to have the logon screen match your desktop wallpaper, just choose the wallpaper using the browse button.
 You can then save the wallpaper as a logon screen file and even share it with other people on WinCustomize.
All you have to do is download and install the utility, and click the apply button to immediately see the changes. (It will lock your computer to show you, so you'll have to use your password to unlock it)

The utility is remarkably easy to use, just click on an entry in the list, and use the Apply button to select it. The download button will take you to the directory of logon screens on WinCustomize.

You can also click the Create button and choose any image you want. For instance, if you wanted to have the logon screen match your desktop wallpaper, just choose the wallpaper using the browse button.

Labels:
Computer Tips
![]()
Hide Desktop Icon Text on Windows Vista
Some icons are just obvious enough that nobody should need text below them to tell them what the icon is for. A good example of this is the icon for Internet Explorer. We're all really used to it by now, and the text just makes it ugly.
Just right-click on the shortcut, and choose Rename. Now hold down the Alt key and type in 255 on the keypad to the right of the keyboard. You can't use the number keys right above the keyboard, they won't work. If you have a laptop, you can turn on numlock and then use the little number keys next to the regular letters. (You know you always wondered what they were for)

For the first shortcut on the desktop, a simple Alt+255 will do. For the next shortcut, you'll have to enter the combination twice (Alt+255, Alt+255). For the third, 3 times… you get the idea.
The way this works is that the Alt+255 character is blank, so the shortcut filename is actually just named with a character that is completely blank. Since you can't have two shortcuts or files named the exact same thing, the second shortcut will have to be named with two blank characters.
Now we have a sweet looking icon on the desktop, with no bothersome text beneath it.

This tip should actually work on any version of Windows, but it works a lot better on Vista, because Vista has beautiful icons.
If you use this tip to rename a folder, you will not be able to rename the folder back using the right-click rename. I’m not sure why this is. What you’ll have to do is open a command prompt and change directory into the containing folder (For instance, the desktop folder), and run this command:
You will need to actually type the Alt+255 characters where illustrated in the command. It will appear as a space.
Just right-click on the shortcut, and choose Rename. Now hold down the Alt key and type in 255 on the keypad to the right of the keyboard. You can't use the number keys right above the keyboard, they won't work. If you have a laptop, you can turn on numlock and then use the little number keys next to the regular letters. (You know you always wondered what they were for)

For the first shortcut on the desktop, a simple Alt+255 will do. For the next shortcut, you'll have to enter the combination twice (Alt+255, Alt+255). For the third, 3 times… you get the idea.
The way this works is that the Alt+255 character is blank, so the shortcut filename is actually just named with a character that is completely blank. Since you can't have two shortcuts or files named the exact same thing, the second shortcut will have to be named with two blank characters.
Now we have a sweet looking icon on the desktop, with no bothersome text beneath it.

This tip should actually work on any version of Windows, but it works a lot better on Vista, because Vista has beautiful icons.
If you use this tip to rename a folder, you will not be able to rename the folder back using the right-click rename. I’m not sure why this is. What you’ll have to do is open a command prompt and change directory into the containing folder (For instance, the desktop folder), and run this command:
ren “Alt+255” “NewFolderName”
You will need to actually type the Alt+255 characters where illustrated in the command. It will appear as a space.
Labels:
Computer Tips
![]()
Show Your Name In the System Clock
This tip is absolutely and completely useless, and will even make applications that depend on timestamps have issues. It's mostly just to be used as a cool trick you can show off to your friends, so we're going to show you how it works.
The way this trick works is by modifying the regional settings for the time format. Instead of using just AM or PM, you can put up to 12 characters of text in that field.

Start by opening Regional and Language Options from the start menu search box or the control panel.

On the Formats tab you'll see the "Customize this format" button, which you'll need to choose.

Select the Time tab, and then here's where we can make whatever settings we want.

I chose to set mine to "AM - Geek" so I could still see AM or PM, but you can choose any 12 characters for either field. Keep in mind that the PM symbol is only going to display during the "PM" hours.
This does change more than just the displayed clock, so I'd advise not using this on a computer you do actual work on. Using the F5 key in notepad shows the "Geek" text as well:
 It's one of those things that's interesting to know… just not very useful. It does work in XP as well.
The way this trick works is by modifying the regional settings for the time format. Instead of using just AM or PM, you can put up to 12 characters of text in that field.

Start by opening Regional and Language Options from the start menu search box or the control panel.

On the Formats tab you'll see the "Customize this format" button, which you'll need to choose.

Select the Time tab, and then here's where we can make whatever settings we want.

I chose to set mine to "AM - Geek" so I could still see AM or PM, but you can choose any 12 characters for either field. Keep in mind that the PM symbol is only going to display during the "PM" hours.
This does change more than just the displayed clock, so I'd advise not using this on a computer you do actual work on. Using the F5 key in notepad shows the "Geek" text as well:

Labels:
Computer Tips
![]()
Saturday, October 27, 2007
To know IP Addresses
An IP Address is 4 sets of decimal numbers, 0-255, separated by periods (for example, 192.168.255.251) which form the address of a computer on the internet or within a local network, and allow it to be referenced by other computers.
An IP address consists of two parts, a network portion and a host portion.
Within a single network, for example the one you are about to set up, all computers will have identical network portions. In order for two computers to communicate with each other directly, they must be in the same network, and thus have identical network portions of their IP addresses.
The host portion of an IP address indicates a computer's unique identifier within its network. Every computer on a given network must have a unique host portion in order to communicate with other computers in the same network.
An IP address is always accompanied by a subnet mask, which separates the network and host portions of the IP address. A subnet mask is shown in the same format as the IP address (for example 255.255.255.0). As far as this article is concerned, assume that the values of the 4 sets of numbers in the subnet mask can be either 0 or 255.
Sets with the value of 0 indicate the host portion of the IP address, and sets with the value of 255 indicate the network portion. For example, with an IP address of 192.168.3.25 and a subnet mask of 255.255.255.0, the network portion of the address would be '192.168.3', and the host portion would be '.25'. This means the computer assigned this address is host 25 within the 192.168.3 network.
Things do get significantly more complex than this, especially when you consider that the subnet mask is not actually restricted only to values of 0 or 255, but that is beyond the scope of this article.
Now, on with the networking !!!
!!!
An IP address consists of two parts, a network portion and a host portion.
Within a single network, for example the one you are about to set up, all computers will have identical network portions. In order for two computers to communicate with each other directly, they must be in the same network, and thus have identical network portions of their IP addresses.
The host portion of an IP address indicates a computer's unique identifier within its network. Every computer on a given network must have a unique host portion in order to communicate with other computers in the same network.
An IP address is always accompanied by a subnet mask, which separates the network and host portions of the IP address. A subnet mask is shown in the same format as the IP address (for example 255.255.255.0). As far as this article is concerned, assume that the values of the 4 sets of numbers in the subnet mask can be either 0 or 255.
Sets with the value of 0 indicate the host portion of the IP address, and sets with the value of 255 indicate the network portion. For example, with an IP address of 192.168.3.25 and a subnet mask of 255.255.255.0, the network portion of the address would be '192.168.3', and the host portion would be '.25'. This means the computer assigned this address is host 25 within the 192.168.3 network.
Things do get significantly more complex than this, especially when you consider that the subnet mask is not actually restricted only to values of 0 or 255, but that is beyond the scope of this article.
Now, on with the networking
Labels:
Internet Tips
![]()
About networking and file sharing
Networking, or connecting computers together to share information, has long been one of the more difficult areas of basic computing to get a grasp on, mainly because it is one of those points at which the generally friendly user interface of your average Windows box starts showing cracks, or possibly gaping holes ready to swallow up the unsuspecting user.
Now granted, since windows 98 started the process, Microsoft's OSs have been getting progressively better at automating the process of connecting computers together, but there is still the external setup required, and if something goes wrong... well it's good to know where to look to fix it.
The purpose of this article is two-fold. First, to enable you to set up your own home network and share files between your computers, and second to make you comfortable with basic computer networking terminology and practice. Internet sharing deserves its own article, and so is not part of this one.
First, some important terms. Skip them if you know them.
Ethernet Network adaptor
An internal device that allows computers to communicate with each other via electrical signals passed through cable. Also known as a NIC (Network Interface Card).
Hub
An external device with multiple connections (ports). A computer attached to one port can communicate with computers attached to any of the other ports. They are available in many sizes, most commonly 5 ports.
Switch
Similar to a hub, but more efficient. While a hub will send data it receives from one port out all its other ports and let the computers attached to it figure out who the data is intended for, a switch stores information about the computers connected to it, then sends data only to the computer it is addressed to.
Firewall
A term for a software program or hardware device which can restrict specific kinds of data from passing into (or in some cases, out of) your network from the internet. Used for security purposes.
Cable/DSL router
Network devices which combine the functions of a switch and a firewall. They also provide the ability to easily share a DSL or cable Internet connection.
By default, all Windows operating systems use the TCP/IP protocol suite to communicate with each other through network devices. We'll look at this vital method of addressing computers on the next page.
By default, all Windows operating systems use the TCP/IP protocol suite to communicate with each other through network devices. Any computer network adaptor using TCP/IP requires 3 things to communicate with other computers: An IP address, a subnet mask for that IP address, and a default gateway. These terms will be defined in a moment. First, though, an idea of how a TCP/IP network works logically.
When you give a computer an IP address, you identify the network which it is a member of, and give it an identification number within that network. A computer in a given network can communicate with any other computer that is local to it (in the same network), provided there is a way for information to pass between them (network cables, wireless network, etc.).
Computers in a network cannot, however, communicate with computers in a different network (remote network) directly, even if they are physically connected to each other via cables.
This is where the default gateway comes in. A gateway is defined as a path out of the local network to other remote networks. A gateway can be a number of things physically, such as a DSL/cable router for your local network, a Windows server computer with multiple network adaptors split between different networks, etc. Gateways must all share one thing in common though. They are connected to at least 2 networks, and have the ability to pass traffic between them.
The default gateway assigned to a network adaptor is sent all traffic that does not belong in the local network. As an example of this, say you have a DSL Internet connection. When you connect to the Internet, you are provided with a default gateway assigned by your service provider. When you attempt to connect to a site on the Internet, the URL you type is converted into an IP address by your Internet provider.
Since this address is not going to be in your local network, the network adaptor in your computer forwards the request for the web page to its default gateway, your service provider.
From that point, your request will be passed from network to network through the internet until it reaches the local network and the data needed to display the web page starts its way back through the internet to your IP address.
That isn't where IP addresses stop, as you'll discover next.
Labels:
Computer Tips
![]()
Friday, October 26, 2007
Tweaking your windows settings
I hope these are a list of programs to help you mess around with you registry settings. Before you do anything remember these programs could really mess up your system and I don't want you complaining to me if you do. These programs are
1. For advanced users
2. People that know how to get themselves out of trouble when they do get themselves in trouble.
There is my disclaimer before you try any of these programs, so don't complain to me, because your pleas will fall on deaf ears. I'll try to help you if you screwed things up, but don't send me a bill. Now I'm not sure if I should even include this section...ahh what the heck, mayhem can be fun and it makes you grow as a person.
Fresh UI
This has lots of basic hacks that will make your system run a little more like you want it too. It's what I consider it a "safe" program. Has lots of things that you can change, you shouldn't get into trouble using this program. Lots of changes you can make to your system and you really don't have to worry about destroying your computer with it...it's also a freeware download, so no harm in downloading it and giving it a try.
Tweak UI
This is part of the Power Toys Microsoft puts out but doesn't really support. Basically Microsoft is saying, "Here's this program, it's cool, can do lots of stuff, but if you screw up don't come crying to us". There are two versions of this program, one for Win XP and one for Win 98, 95, ME...Download the right one.
These are the two programs I've tried, if you have any that you like just drop me an email and I'll check it out. I'll be writing registry hacks for this site where you go directly into regedit and do the changes yourself...but it's late tonight while I write this and I'll continue and add more as this website gets a little bit older and gets more visitors.
Labels:
Computer Tips
![]()
Wednesday, October 24, 2007
Tips increasing system browsing
Another thing XP has changed is the way the folder icons look. It used to be small icons for the all the drives and the controll panel now it's made up of rather large icons that consume their fair share of the system resources.


Uncheck - Display file size information in folder tips
Uncheck - Display simple folder view of Explorer's Folders list
Check - Display the contens of system folders
Check - Display the full path in the address bar
Check - Display the full path in the title bar
Check - Do not cache thumbnails
Check - Show hidden files and folders
Uncheck - Hide extensions for know file types
Check - Hide protected operating system files (Recommended)
Uncheck - Launch folder windows in a seperate process
Uncheck - Remember each folder's view settings
Uncheck - Restore previous folder windows at logon
Check - Show control panel in My Computer
Check - SHow encrypted or compressed NTFS files in color
Uncheck - Show pop-up description for folder and desktop items
Check - Use simple file sharing

Now browsing through the Windows file system should be immensely faster.
- To prevent the large icons from taking up too much system resources start by clicking on the view button --> list

- Next click on the view button again --> status bar.

- Double click on my computer, a window will pop up, at the top of the window click on the tools button --> folder options.

- General tab, you won't need to do anything here.
- View tab, it's comprised of two sections, folder view and advanced settings. In the advanced sections area start by making sure you have the same settings as listed below,
Uncheck - Display file size information in folder tips
Uncheck - Display simple folder view of Explorer's Folders list
Check - Display the contens of system folders
Check - Display the full path in the address bar
Check - Display the full path in the title bar
Check - Do not cache thumbnails
Check - Show hidden files and folders
Uncheck - Hide extensions for know file types
Check - Hide protected operating system files (Recommended)
Uncheck - Launch folder windows in a seperate process
Uncheck - Remember each folder's view settings
Uncheck - Restore previous folder windows at logon
Check - Show control panel in My Computer
Check - SHow encrypted or compressed NTFS files in color
Uncheck - Show pop-up description for folder and desktop items
Check - Use simple file sharing
- After you're done checking and unchecking all of of those options, click on apply button at the bottom of the window, then at the top. Click on the "Apply to All Folders" button to apply the same settings to ALL windows folders. Click on the X to close the window. You won't need to do anything else on the other tabs.

Now browsing through the Windows file system should be immensely faster.
Labels:
Computer Tips
![]()
Tuesday, October 23, 2007
Clearing the file and URL history in Windows Media Player
When you play a file, link to the file is stored in the Windows Media Player history. To clear the file and URL history in Windows Media Player 10, use the following steps:
Labels:
Computer Tips
![]()
Safe guard system from spyware
Spyware is the fastest growing threat on the Internet. Certain variety of spyware is becoming as dangerous as viruses and trojans, while some don't cause any major harm to the system - but still report your internet surfing habits to a remote webmaster. That's not all, but they affect the system performance as well. Here are the spyware removal and protection tools which you must have, at the very least. Before proceeding to Spyware removal, I would advice you create a System Restore point in XP (in case), considering the fact that 'sometimes' spyware removal affects the normal operation of Windows.
Spyware Prevention and Removal Tools/methods
Prevents spyware from being installed, by blocking a huge list of known spyware controls. Weekly updates available via it's Auto-Update feature. Most effective method I have ever seen. Uses the technique named Kill-Bit using which bad controls are blocked. Note that if your system is already infected with spyware, this software does not help much. This software is purely a shield. Highly recommended product!
Download Spyware Blaster or click here
Lavasoft Ad-Aware
Award-winning spyware remover, also a freeware. Updated frequently as and once new spyware variants are discovered. and web-update feature available.
SpyBot Search & Destroy
This software is equally good as Ad-Aware, in addition contains Immunize feature where-in you can block a list of known ActiveX controls (using the same Kill-Bit technique as SpywareBlaster uses). Also provides a SBHelper Browser Helper Object to plug-in to Internet Explorer. The BHO is very useful to block unwanted ActiveX controls and Cookies while surfing. Automatic Update feature available. Restricted Zones list also available.
HijackThis
Very popular diagnostic utility, which displays almost EVERY browser add-ons installed and generates a report for troubleshooting unknown problems (if the above tools fail to solve the problem). A technician, by looking at the HijackThis log can pin-point where the hijacker resides and can eliminate them easily. THIS TOOL lists all SPYWARE BROWSER EXTENSIONS and also the LEGIT ones. You require a greater skill level to diagnose this log. So, don't fix the entries yourself if you don't know what you're doing with HijackThis.
Download anti-spyware reference files locally and apply to other computers Plus, there are other methods and tools to block unwanted sites (using Hosts file, and using Restricted Zone in Internet Explorer) You need a combination of all of the above removal tools (in most cases), I repeat "ALL". And, updating the definitions is equally important. Without the updated definitions, running a spyware cleaner is almost useless. Note that anti-virus software can't remove spyware, they can only deal with viruses and trojans.
Labels:
Internet Tips
![]()
Disabling the Notification area Balloon tips
This article explains how to disable Notification Area balloon tips in Windows Vista.
Method 1
HKEY_CURRENT_USER\Software\Microsoft\Windows\CurrentVersion\Explorer\Advanced
This method applies to Windows XP as well.
Method 2
User Configuration \ Administrative Templates \ Start Menu and Taskbar
Here is the corresponding registry value for the above setting:
[HKEY_CURRENT_USER\Software\Microsoft\Windows\CurrentVersion\Policies\Explorer]
"TaskbarNoNotification"=dword:00000001
Sample Notification area balloon tip
Labels:
Computer Tips
![]()
Update Your Antivirus
As a new virus (on computer terms) appear, your antivirus program must know that one.
So basically, there are two update for your antivirus :
1. Update the engine (antivirus program).
2. Update the database of virus.
Some antivirus offering option to download/update online via internet. But how if you have many computer to proses ? Some provide an offline update files. Which you can copy/transfer and run on the other computer.
Here the list of link for download (offline prefered) update your antivirus. If you have other antivirus, please put it on the comment. NOTE , some will need your login/password/registration info.
AVG / Grisoft :
AVG Updates and Free version (free version)
Norton / Symantec :
http://securityresponse.symantec.com/avcenter/download/pages/US-N95.html
(beware the i-32 and x-86 version)
McAfee :
http://download.mcafee.com/updates/superDat.asp
!!! Do not download these updates if you are a subscriber of McAfee VirusScan or McAfee Personal Firewall. (Do no why they put it) because some said the new one, just update online.
Fprot :
http://www.f-prot.com/download/home_user/
http://updates.f-prot.com/cgi-bin/get_randomly?fp-def
http://updates.f-prot.com/cgi-bin/get_randomly?macrdef2
Check also :
F-PROT for DOS Info
Clamav :
/usr/local/bin/freshclam –quiet -l /var/log/clam-update.log
Copy the data files to other pc.
Antivir / Free-av :
http://www.free-av.com/antivirclassic/vdfdown.html
Avast! :
http://www.avast.com/eng/updates.html
Platinum / Panda :
http://www.pandasoftware.com/download/Client+Zone/
Norman : must online
NOD :
Tequilla_boyz point to
http://download.paipai.net/texts/components.htm
Labels:
Computer Tips
![]()
Sunday, October 21, 2007
Tips system restore for WinXP
Windows XP when it was first released had such a positive buzzzzzz around it that you thought it would be able to leap small buildings in a single bound, that it would be able to run faster than a locomotive, that it would have a girlfriend named Lois!!!! Once you installed XP it basically looks like a fancy version of Windows 98...alright so you don't know what's so good about it and I remember the first day I installed XP I stopped and thought, "This is what everyone was screaming about?" It took me a week before I started to see what was so great about Windows XP and I think that the best feature in Windows XP would be the System Restore function.
Most Windows XP users probably haven't had the opportunity to try System Restore, or for that matter, they probably didn't even realize Windows XP came with such a function. So, what is System Restore? Basically it's a time machine for you computer. Let me explain, say your computer was working just fine a few days ago, but alas today it doesn't work at all...could it have been that download you installed? EGAD, what can you do to fix this...well you use System Restore. Basically System Restore takes a daily snapshot of your computer and stores it there. If your computer should suddenly not work one day all you have to do is go to System Restore and pick a day or a restore point for your computer (basically a day where your computer was working) and then the computer will reboot and be like new again or at least like a day ago when it was working. So, here's what you do:
Go to Start-->All Programs-->Accessories-->System Tools-->System Restore
Once you do this it will open up program that looks like this:
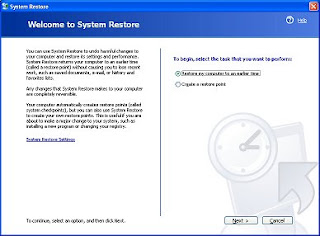
There will be two options on this first page:
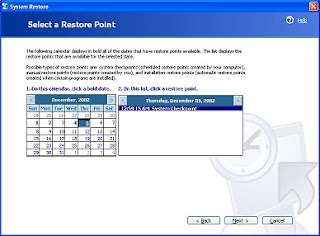
Oh so cool, a calendar, yes that has a listing of all the restore points, basically you can restore your computer to weeks earlier, but I don't recommend that, especially if you've installed a lot of software in that time. Basically pick a day or two before, this will get you back to a working computer without having the hassle of installing lots of software again. Then you click Next...it will ask you if you want to restore and then it will reboot your computer...once your computer reboots it will be rebooting to what your computer looked like a few days ago. There you have it!!! Now isn't that cool? I mean if there is any feature that I tell people about XP it's the System Restore function. I've used it once already after I installed some flaky software a friend recommended, ughhh, but System Restore had me smiling in just one reboot.
Most Windows XP users probably haven't had the opportunity to try System Restore, or for that matter, they probably didn't even realize Windows XP came with such a function. So, what is System Restore? Basically it's a time machine for you computer. Let me explain, say your computer was working just fine a few days ago, but alas today it doesn't work at all...could it have been that download you installed? EGAD, what can you do to fix this...well you use System Restore. Basically System Restore takes a daily snapshot of your computer and stores it there. If your computer should suddenly not work one day all you have to do is go to System Restore and pick a day or a restore point for your computer (basically a day where your computer was working) and then the computer will reboot and be like new again or at least like a day ago when it was working. So, here's what you do:
Go to Start-->All Programs-->Accessories-->System Tools-->System Restore
Once you do this it will open up program that looks like this:

There will be two options on this first page:
- Restore my computer to an earlier time
- Create a restore point

Oh so cool, a calendar, yes that has a listing of all the restore points, basically you can restore your computer to weeks earlier, but I don't recommend that, especially if you've installed a lot of software in that time. Basically pick a day or two before, this will get you back to a working computer without having the hassle of installing lots of software again. Then you click Next...it will ask you if you want to restore and then it will reboot your computer...once your computer reboots it will be rebooting to what your computer looked like a few days ago. There you have it!!! Now isn't that cool? I mean if there is any feature that I tell people about XP it's the System Restore function. I've used it once already after I installed some flaky software a friend recommended, ughhh, but System Restore had me smiling in just one reboot.
Labels:
Computer Tips
![]()
Monday, October 15, 2007
Update Windows
The Windows Update service provides a way of checking whether your Windows operating system needs any updates.
This can include security fixes, and software and hardware updates.
It is essential Windows is kept up-to-date to prevent malicious programs taking advantage of security flaws to harm your PC.
You can download and install updates by visiting the Microsoft web site, or set your PC to automatically download the files in the background while you work.
Note that 'updating' is not the same as 'upgrading'. To upgrade your version of Windows XP to Windows Vista, for example, you would need to buy a Windows Vista Upgrade package. Updating Windows only ensures that you have the latest files for your particular Windows version such as XP.
Downloading updates from the Windows Update web site
Some of the steps below may require you to restart your computer, so you may wish to print out a copy of these instructions before you begin. You should also save any work in other windows before continuing.
Note that you will need to use Internet Explorer to visit the Windows Update web site rather than other browsers such as Mozilla Firefox.
Go to www.windowsupdate.com. When you arrive at the site, you may see a message that your browser is checking for the latest version of the Windows Update software. This is the software that determines if your system needs any updates at this time. If you see a Security Warning box appear asking if you wish to install and run Windows Update, click Yes.
You will be asked to choose between Express (essential updates) or Custom (optional updates for other programs). Most users should click the Express button.
The Windows Update software will now check which updates you already have and which you need.
If after the scan you see the message 'No high-priority updates for your computer are available' this means the most important updates including security fixes for Windows are already installed on your system and you can leave Windows Update for now.
Installing Updates
If you require any high-priority updates, the Windows Update program automatically selects all critical updates to be installed. Click Install Updates.
Your updates will now be downloaded and installed, note that this may take several minutes or longer depending on your Internet connection and how many updates you need to install.
Once this is complete, you will be asked if you want to restart your computer now. Make sure you have saved your work in any other windows you have open, then click Yes and your computer will restart.
You should check the Windows Update web site once a month for any new updates.
Automatic Updates
Another way to get Windows updates is to have the files downloaded automatically to your computer using Automatic Updates.
The advantage of this is you can let Windows download updates in the background while you work, so you do not need to worry about updating manually.
A disadvantage of Automatic Updates is that it may use up some of your Internet bandwidth to download updates, which might be a problem if you are in the process of downloading a large file or playing an online game at the time and need the best speed possible. You can avoid this problem by setting a particular time for updates to be downloaded.
To turn on Automatic Updates, click on your Start menu, go to Control Panel and double-click Automatic Updates. Here you can choose whether to get updates automatically, set which times to download updates, and if you want to be notified before updates are downloaded or installed.
![]()
Update Hardware Devices
In order to make your hardware (such as graphics and sound cards, scanners, printers) work properly, Windows relies on special programs called Drivers.
These tell Windows how to use your hardware, and these drivers will either be installed on your PC along with Windows, pre-installed by the company you bought the PC from, or on the disks or CDs that came with your hardware. They can often also be downloaded from the website of the company who made the particular device, and this is also where you will be able to find any newer versions of the drivers.
Making sure you have the latest drivers for your hardware is the first step you should take if you encounter problems such as unstable Internet connection, graphics problems, crackling/popping sound, slow performance or crashes when running programs.
Identifying Current Drivers
First you need to identify the Driver version you currently have on your computer. Click on Start, go to Control Panel and then double-click System. Click on the Hardware tab and look for the button called Device Manager. You should now see a list of the hardware on your PC, divided into categories of hardware types.
By the side of each category you should see a small symbol. If the symbol looks like(+) it means the section can be 'expanded' (i.e. opened up to show items within this section) by left-clicking once on the symbol. When the symbol looks like you should be able to see a list of items under this section.
Look for the piece of hardware you want to update. Here are some examples of the categories you might be able to find your hardware devices under:
Modem (e.g. SpeedTouch USB) - under Network adapters
Graphics card (e.g. Nvidia Geforce) - under Display adapters
Sound card (e.g. SoundBlaster) - under Sound, video and game controllers
once on the symbol. When the symbol looks like(-) you should be able to see a list of items under this section.
Look for the piece of hardware you want to update. Here are some examples of the categories you might be able to find your hardware devices under:
Modem (e.g. SpeedTouch USB) - under Network adapters
Graphics card (e.g. Nvidia Geforce) - under Display adapters
Sound card (e.g. SoundBlaster) - under Sound, video and game controllers
Once you have located the piece of hardware you want to update, right-click the item and select Properties, then click on the Driver tab on the new window and you should now see some details about the driver currently being used for this hardware. Make a note of the Driver Date and the Driver Version, then close this window. Close the Device Manager window when you have made notes of all the devices you want to update.
Downloading New Drivers
To find the latest version of the driver for your hardware, you need to visit the manufacturer's web site. If you bought the device separately from your PC, finding the address of the manufacturer's web site may be as simple as looking in the manual or documentation that came with your hardware.
You can also try using a search engine and typing in the name of the company, or better still the name of your device. So for example, if you want to find the driver for your NVIDIA GeForce graphics card, type nvidia geforce driver into a search engine and try to find the correct web site - in this case www.nvidia.com
Once you have found the Driver download page, you will need to find and download the latest driver for your particular piece of hardware. You can then make a comparison between the drivers listed and the Driver Date and Driver Version you made a note of earlier, to see whether you need to update.
The process will vary from site to site, but before you download the driver file you may be asked to select things like your operating system (e.g. Windows XP), your language (e.g. English) and the name of your particular device.
Using NVIDIA's site as an example, you are presented with three tables from which you must select the type of download (e.g. Graphics driver), the make of device (e.g. GeForce) and the operating system you are running (e.g. Windows XP). When you have made your selections, clicking on the Go button will take you to a page where you can download the latest driver by clicking on one of the download site links.
When downloading a driver you may be asked to agree to some terms and conditions first, click Accept and then a File Download window will open, click Save to put the driver installation file somewhere on your computer.
Installing New Drivers
Locate the driver file you have downloaded, which will usually be of the file type .exe or .zip, and follow these instructions:
.EXE If it is an .exe file you can just double-click it to begin installation.
.ZIP If it is a .zip file then this is a compressed file and you will need to unzip it first using a program such as WinZip. Extract the file inside the zip to somewhere on your computer, then double-click it to open it.
Driver installation procedures may vary, but you may be asked to choose your Language, select certain options or agree to terms. After installation is complete, you may have to restart your PC, in which case you should make sure to save any work in other windows first. After restarting you can check the Driver Date and Driver Version number have changed to the latest version by going into Device Manager as before.
You can check the help and support pages, Frequently Asked Questions (FAQs) or messageboards on the manufacturer's website if you have any problems.
![]()
Compress Files
Some files can be too big to be quickly transferred across the Internet or between PCs. This guide describes how to use the WinZip program to compress files for easier transfer and storage.
Installing WinZip
You can download a trial version of WinZip from www.winzip.com
After the trial period is over you will be reminded to purchase a License to continue using the program.
Choose a site to download from and click Download Now. Choose to Save To Disk and choose a location on your computer to save to.
Double-click the winzip file you have downloaded to begin installation. Click Setup then OK to install to your Program Files folder. As you proceed through the setup options you will need to click Next to move on to the next screen.
Click Yes to agree to the License Agreement. You can now view or print a Quick Start guide if you wish to. Choose Start with the WinZip Wizard.
Choose Quick Search and after a few seconds WinZip will finish making a list of your folders. The setup will also need to associate WinZip with various filetypes. When WinZip Setup has finished, click Close.
Using WinZip
To start the program, double-click the WinZip shortcut on your desktop, or alternatively click on the Start menu then All Programs > WinZip > WinZip.exe.
Click on Use Evaluation Version. You should now see the WinZip Wizard, which helps you perform the most common tasks associated with WinZip. Click Next and for this example, Create A New Zip File.
Choose a filename such as "ZipTest" which will be saved to the default folder, or use Browse to choose a different folder, enter the filename and click OK.
Click Next. Use the Add Files button to add the files you want to compress, or you can click and drag them into the empty box. When you have added the file or files you want to compress into this Zip file, click ZipNow then Finish.
WinZip will close and if you now look in My Documents or whichever folder you specified earlier, you should see a .zip file called "ZipTest". To open this or any other Zip file, in Windows XP you can double-click it as if it were a normal folder. From here you can drag the files out, which will extract them so they can be used as normal.
Alternatively, right-click the file and choose Open With WinZip. Click Evaluation Version and you should see the Wizard again.
Click Next then UnZip or Install from "ZipTest.zip". Click Next and choose a folder to extract the contents of the Zip file to (the default location is a folder called Unzipped in My Documents).
Click Unzip Now. In the folder you specified you should now be able to see the files you originally compressed in the Zip file, extracted and ready to use again. Click Finish in WinZip to close the program.
Labels:
Computer Tips
![]()
How To Keep Kids Safe On The Web

The World Wide Web provides a wonderful resource for entertaining and educating children.
However, dangers do exist and it is important for kids and parents to be aware of these dangers and to know how to stay safe online.
This article features practical advice for both kids and parents.
Advice for Kids
The Internet is full of interesting web sites and is a great way to meet new friends across the world who share your interests. Unfortunately, not everyone you meet on the World Wide Web is friendly and some people even pretend to be someone they're not.
To make sure you have a safe time while you're surfing the Web, remember these tips:
- Avoid giving out your e-mail address to people you don't know
- Never give out your full name, telephone number, home address or the name of your school
- Don't open e-mails or attachments from people you don't know
- If you visit a web site or receive an e-mail that makes you feel uncomfortable, tell your parent or whoever looks after you
- Don't tell other people your Internet passwords
- Never agree to meet up with someone you have met on the Internet
- Try to avoid staring at the screen for too long without a break
Some interesting web sites for you to try:
www.kidscom.com - fun and games
www.bbc.co.uk/cbeebies - games and fun things to do
www.yahoo.com - Yahoo! kids search engine
www.bbc.co.uk/schools - BBC Schools
www.channel4.com/learning - homework help
Advice for Parents
There are many useful sites with advice about safety for children online including:
www.kidsmart.org.uk
www.nspcc.org.uk
www.nch.org.uk
www.safekids.com
www.protectkids.org
Restricting Internet use to a PC in a family room is one way you can keep an eye on your child's browsing activities. You will be able to take an occasional glance to make sure they are safe, without them feeling like you are watching their every move.
Letting them know your concerns and educating them about the dangers of the Internet will help them understand you are not trying to stop them enjoying the Web, just making sure that they have a safe experience.
There are also various software packages available that can help you monitor your child's browsing when you are not in the room.
These programs can record browser web addresses, e-mails, and chat software, and can also filter and block certain web sites and even record what has been typed on the keyboard:
www.softwarexpress.com - The Internet Babysitter
www.cyberpatrol.com - CyberPatrol
www.riasc.net/plg.aspx - Parental Lock Guard
www.netnanny.com - Net Nanny
www.naomifilter.org - Naomi
www.surfsafe.co.uk - SurfSafe
If your kids use Google to search for things, in the Preferences next to the search box there are options under SafeSearch Filtering to block explicit images or text.
There is a plug-in available for the Firefox web browser called Gubble, which allows you to set permissions on which web sites kids can visit.
In Windows it is possible to create a separate user account that can be restricted so that the user cannot install harmful software, remove crucial files or change Windows settings.
Create a new user account for your child by clicking on the Start menu then Control Panel and clicking on User Accounts. Click Create a new account, choose a name and choose a Limited account then click Create Account.
You may also wish to put a password on your own Administrator account so that your child cannot use it to install or remove programs.
Labels:
Internet Tips
![]()
My best removing Spyware, Adware and Malware tools
If you have been on the Internet for any length of time, you've probably ran across the topic of spyware, adware, or malware. This is software that has installed on your computer, many times without your permission, or accidentally by clicking on a popup ad, etc. The problem with these programs is they will slow your computer down, make changes to your desktop, homepage, search page, load programs into your taskbar tray and otherwise get in the way. In the worst cases, they will even transmit information from your computer to servers on the Internet.
So the question becomes, if your computer is infected with these problematic programs, how do you get rid of them. In most cases, you can run a free removal program to remove these infections, in more serious cases, you may have to download a specialized removal program to free yourself of these problems.
Listed below you will find the best freeware programs available on the Internet for removing spyware, adware, and malware:
Adware and Spyware Removal
Lavasoft Ad-Aware 2007 7.0.2.3
Spybot - Search and Destroy 1.5
Microsoft Windows Defender
a² (a-squared) Scanner
Preventing the Installation of Adware and Spyware
SpywareBlaster 3.5.1
SpywareGuard 2.2
Specialized Removal Programs
CWShredder 2.19 - CoolWebSearch Removal Tool from Trend Micro
EliteToolbar Remover V.2.1.2
Incredifind and PerfectNav Uninstaller
Kill2Me - Removal of Look2Me infections
Lop.com Uninstaller
OmegaKiller for removing hijackers
VX2.BetterInternet for XP/2000 for Removing Look2Me
WildTangent Remover
Programs to Delete Undeletable Files
Pocket Killbox
Remove on Reboot Shell Extension
Unlocker
Helpful Tools for Investigating Adware and Spyware Infections
HijackThis 1.99.1 by Merijn
SysInternals Process Explorer
Sysinterals RootkitRevealer
Online Virus Checkers
Trend Micro Housecall - will scan and remove threats
BitDefender Scan Online - will scan and remove threats
Ewido Online Scanner - (Now AVG) will scan and remove threats
F-Secure Online Scanner - will scan for rootkits as well
Kaspersky Online Scanner - appears to only scan for but not remove threats
Panda Activescan - appears to only scan for but not remove threats
McAfee FreeScan - appears to only scan for but not remove threats
eTrust Antivirus Web Scanner - will scan and remove threats
Symantec Security Check - will scan and remove threats
Dr.Web Online Check - user can upload and test for threats on particular files
Trojan Scanner
TrojanScan by WindowsSecurity.com
Free Antivirus Programs to Download
ANTI-VIR
AVAST
AVG
TCP/IP and Winsock Repair Utilities for Windows XP and 2000
LSPFix by Cexx.org
Winsock XP Fix
XP TCP/IP Repair utility
Labels:
Computer Tips
![]()
Subscribe to:
Comments (Atom)


 Computer Tips

