By holding down alt, then typing numbers on the number pad (right of the keyboard) you can create special characters. If you hold down alt, then press 1, then let go, you got the ascii character 1. You try some randomn numbers. This goes all the way up to 255. Open a dos prompt, and type md (alt+1+9+4)someword. md is the dos command to make a directoy, now try and open the directory in Windows, you can't. To open it, type ren (alt+1+9+4)someword someword (ren is the dos command to rename).
Showing posts with label Computer Tips. Show all posts
Showing posts with label Computer Tips. Show all posts
Saturday, December 15, 2007
Friday, December 14, 2007
Get rid of Shortcut Arrow from Desktop Icons
Have you ever noticed shortcut icons in desktop ? It has an arrow in the corner of each icon. Today’s tips will let you remove it completely. OK, let you follow the steps.
1. Open the Registry Editor program by running regedit, click Start > Run and type regedit then press Enter.
2. Find the key path.
HKEY_CLASSES_ROOT\lnkfile
3. Click on the lnkfile folder, you will see IsShortcut key in the right page like the picture below.
4. Right click on IsShortcut and choose Delete. Click Yes button.
5. Log off and then Log on Windows XP again.
6. Now the shortcut arrows are disappeared.
Labels:
Computer Tips

Hide specific Drives
This tutorial illustrates how to hide and show your computer drives from Windows XP. You can hide or show as you want both drives in your computer and drives in the computer network. This way can be safe for data in your computer and prevent others from accessing to your drives that may contain important information. This example I will hide drive D and you can apply this method to another drive you want, just change a value that I will explain “how to” in detail. Let you hide drives now.
1. Access to the Registry Editor program, running regedit.
2. Find the path like below,
HKEY_CURRENT_USER>Software>Microsoft>Windows>CurrentVersion>Policies>Explorer
3. Right click on the Explorer folder and select New > DWORD Value.
4. Name the registry NoDrives.

5. Double click on NoDrives which is in the right page.
6. In the DWORD Value window, select Decimal.

7. In this case I want to hide drive D, so I must fill 8 in Value data. The number you filled varies with drive you want it to be hidden. If you want to hide the other drives, you must put the drive-related number like below,
Note :
A=1, B=2, C=4, D=8, E=16, F=32, G=64, H=128, I=256, J=512, K=1024, L=2048, M=4096, N=8192, O=16384, P=32768, Q=65536, R=131072, S=262144, T=524288, U=1048576, V=2097152, W=4194304, X=8388608, Y=16777216, Z=33554432, All drive=67108863
For example, I can hide drive J only if I put the number 512 under selecting Decimal. What to do in case I prefer to hide more than one drive ? That is easy just plus the numbers. To illustrate, I want to hide drive C and E so I put the result number of 4 plus 16 that is 20.
8. Click OK button and close the Registry Editor program.
9. Log off and Log on your computer. Finish !
1. Access to the Registry Editor program, running regedit.
2. Find the path like below,
HKEY_CURRENT_USER>Software>Microsoft>Windows>CurrentVersion>Policies>Explorer
3. Right click on the Explorer folder and select New > DWORD Value.
4. Name the registry NoDrives.

5. Double click on NoDrives which is in the right page.
6. In the DWORD Value window, select Decimal.

7. In this case I want to hide drive D, so I must fill 8 in Value data. The number you filled varies with drive you want it to be hidden. If you want to hide the other drives, you must put the drive-related number like below,
Note :
A=1, B=2, C=4, D=8, E=16, F=32, G=64, H=128, I=256, J=512, K=1024, L=2048, M=4096, N=8192, O=16384, P=32768, Q=65536, R=131072, S=262144, T=524288, U=1048576, V=2097152, W=4194304, X=8388608, Y=16777216, Z=33554432, All drive=67108863
For example, I can hide drive J only if I put the number 512 under selecting Decimal. What to do in case I prefer to hide more than one drive ? That is easy just plus the numbers. To illustrate, I want to hide drive C and E so I put the result number of 4 plus 16 that is 20.
8. Click OK button and close the Registry Editor program.
9. Log off and Log on your computer. Finish !
Labels:
Computer Tips
Thursday, November 22, 2007
How to Create a Control Panel components Desktop Shortcut
Control Panel menu in Windows XP has many components, such as User Accounts, Add/remove programs, Security Center, and many more. Now, the question is, how to create a desktop shortcut for the componenets? If you find yourself using any of these frequently, and you want to access them from the desktop, you should be create a shortcut, but how?
Follow this simple step: First, go to this directory ---> \WINDOWS\System32, and find these files:
appwiz.cpl -----> Add/Remove Programs
desk.cpl -------> Display Properties
firewall.cpl ---> Firewall Settings
inetcpl.cpl ----> Internet Options
mmsys.cpl -----> Sound and Audio
ncpa.cpl ------> Network Connections
nusrmgr.cpl ----> User Accounts
powercfg.cpl ---> Power Options
sysdm.cpl ------> System Properties
wscui.cpl ------> Security Center
wuaucpl.cpl ----> Automatic Updates Configuration
Those are control panel components files. To create the shortcut, you just right click the files, and then choose Send To ---> Desktop (Create Shortcut), now, in your desktop was added a shortcut that refer to control panel components you have choosen. If you want, you can change the icon of the shortcut with windows standard icon or the icon you were created...
Labels:
Computer Tips
Removing Properties Menu on "My Computer"
"My Computer" context menu (will be appear when we pushed right click of "My Computer"), by default, will shown properties menu. As we known, in the properties menu of "My Computer", there are some important setting for computer. I will tell you how to make the properties menu disappear from "My Computer" context menu. These are the instruction you can do:
Open Registry Editor by click (Start > Run), then type regedit. Find the following key on your registry editor:
HKEY_CURRENT_USER>Software>Microsoft>Windows>CurrentVersion>Policies>Explorer
Then create new DWORD Value on the key. Then give the value name by NoPropertiesMyComputer. Double click the value, and set the data value by 1. Close the registry editor. Logout from your account or restart your PC to take the effect. Now when you log in again, there isn't properties on "My Computer" Context Menu.
Hope this could help you!!!
Labels:
Computer Tips
Friday, November 2, 2007
Customize Windows Vista Logon Screen
For those of us looking to customize the Windows Vista UI experience, there's nothing more annoying than seeing the default logon screen every time you start up your computer, or when you lock your workstation. Thankfully the nice folks at Stardock have created a free utility to replace the logon screen with any wallpaper you choose.
All you have to do is download and install the utility, and click the apply button to immediately see the changes. (It will lock your computer to show you, so you'll have to use your password to unlock it)

The utility is remarkably easy to use, just click on an entry in the list, and use the Apply button to select it. The download button will take you to the directory of logon screens on WinCustomize.

You can also click the Create button and choose any image you want. For instance, if you wanted to have the logon screen match your desktop wallpaper, just choose the wallpaper using the browse button.
 You can then save the wallpaper as a logon screen file and even share it with other people on WinCustomize.
All you have to do is download and install the utility, and click the apply button to immediately see the changes. (It will lock your computer to show you, so you'll have to use your password to unlock it)

The utility is remarkably easy to use, just click on an entry in the list, and use the Apply button to select it. The download button will take you to the directory of logon screens on WinCustomize.

You can also click the Create button and choose any image you want. For instance, if you wanted to have the logon screen match your desktop wallpaper, just choose the wallpaper using the browse button.

Labels:
Computer Tips
Hide Desktop Icon Text on Windows Vista
Some icons are just obvious enough that nobody should need text below them to tell them what the icon is for. A good example of this is the icon for Internet Explorer. We're all really used to it by now, and the text just makes it ugly.
Just right-click on the shortcut, and choose Rename. Now hold down the Alt key and type in 255 on the keypad to the right of the keyboard. You can't use the number keys right above the keyboard, they won't work. If you have a laptop, you can turn on numlock and then use the little number keys next to the regular letters. (You know you always wondered what they were for)

For the first shortcut on the desktop, a simple Alt+255 will do. For the next shortcut, you'll have to enter the combination twice (Alt+255, Alt+255). For the third, 3 times… you get the idea.
The way this works is that the Alt+255 character is blank, so the shortcut filename is actually just named with a character that is completely blank. Since you can't have two shortcuts or files named the exact same thing, the second shortcut will have to be named with two blank characters.
Now we have a sweet looking icon on the desktop, with no bothersome text beneath it.

This tip should actually work on any version of Windows, but it works a lot better on Vista, because Vista has beautiful icons.
If you use this tip to rename a folder, you will not be able to rename the folder back using the right-click rename. I’m not sure why this is. What you’ll have to do is open a command prompt and change directory into the containing folder (For instance, the desktop folder), and run this command:
You will need to actually type the Alt+255 characters where illustrated in the command. It will appear as a space.
Just right-click on the shortcut, and choose Rename. Now hold down the Alt key and type in 255 on the keypad to the right of the keyboard. You can't use the number keys right above the keyboard, they won't work. If you have a laptop, you can turn on numlock and then use the little number keys next to the regular letters. (You know you always wondered what they were for)

For the first shortcut on the desktop, a simple Alt+255 will do. For the next shortcut, you'll have to enter the combination twice (Alt+255, Alt+255). For the third, 3 times… you get the idea.
The way this works is that the Alt+255 character is blank, so the shortcut filename is actually just named with a character that is completely blank. Since you can't have two shortcuts or files named the exact same thing, the second shortcut will have to be named with two blank characters.
Now we have a sweet looking icon on the desktop, with no bothersome text beneath it.

This tip should actually work on any version of Windows, but it works a lot better on Vista, because Vista has beautiful icons.
If you use this tip to rename a folder, you will not be able to rename the folder back using the right-click rename. I’m not sure why this is. What you’ll have to do is open a command prompt and change directory into the containing folder (For instance, the desktop folder), and run this command:
ren “Alt+255” “NewFolderName”
You will need to actually type the Alt+255 characters where illustrated in the command. It will appear as a space.
Labels:
Computer Tips
Show Your Name In the System Clock
This tip is absolutely and completely useless, and will even make applications that depend on timestamps have issues. It's mostly just to be used as a cool trick you can show off to your friends, so we're going to show you how it works.
The way this trick works is by modifying the regional settings for the time format. Instead of using just AM or PM, you can put up to 12 characters of text in that field.

Start by opening Regional and Language Options from the start menu search box or the control panel.

On the Formats tab you'll see the "Customize this format" button, which you'll need to choose.

Select the Time tab, and then here's where we can make whatever settings we want.

I chose to set mine to "AM - Geek" so I could still see AM or PM, but you can choose any 12 characters for either field. Keep in mind that the PM symbol is only going to display during the "PM" hours.
This does change more than just the displayed clock, so I'd advise not using this on a computer you do actual work on. Using the F5 key in notepad shows the "Geek" text as well:
 It's one of those things that's interesting to know… just not very useful. It does work in XP as well.
The way this trick works is by modifying the regional settings for the time format. Instead of using just AM or PM, you can put up to 12 characters of text in that field.

Start by opening Regional and Language Options from the start menu search box or the control panel.

On the Formats tab you'll see the "Customize this format" button, which you'll need to choose.

Select the Time tab, and then here's where we can make whatever settings we want.

I chose to set mine to "AM - Geek" so I could still see AM or PM, but you can choose any 12 characters for either field. Keep in mind that the PM symbol is only going to display during the "PM" hours.
This does change more than just the displayed clock, so I'd advise not using this on a computer you do actual work on. Using the F5 key in notepad shows the "Geek" text as well:

Labels:
Computer Tips
Saturday, October 27, 2007
About networking and file sharing
Networking, or connecting computers together to share information, has long been one of the more difficult areas of basic computing to get a grasp on, mainly because it is one of those points at which the generally friendly user interface of your average Windows box starts showing cracks, or possibly gaping holes ready to swallow up the unsuspecting user.
Now granted, since windows 98 started the process, Microsoft's OSs have been getting progressively better at automating the process of connecting computers together, but there is still the external setup required, and if something goes wrong... well it's good to know where to look to fix it.
The purpose of this article is two-fold. First, to enable you to set up your own home network and share files between your computers, and second to make you comfortable with basic computer networking terminology and practice. Internet sharing deserves its own article, and so is not part of this one.
First, some important terms. Skip them if you know them.
Ethernet Network adaptor
An internal device that allows computers to communicate with each other via electrical signals passed through cable. Also known as a NIC (Network Interface Card).
Hub
An external device with multiple connections (ports). A computer attached to one port can communicate with computers attached to any of the other ports. They are available in many sizes, most commonly 5 ports.
Switch
Similar to a hub, but more efficient. While a hub will send data it receives from one port out all its other ports and let the computers attached to it figure out who the data is intended for, a switch stores information about the computers connected to it, then sends data only to the computer it is addressed to.
Firewall
A term for a software program or hardware device which can restrict specific kinds of data from passing into (or in some cases, out of) your network from the internet. Used for security purposes.
Cable/DSL router
Network devices which combine the functions of a switch and a firewall. They also provide the ability to easily share a DSL or cable Internet connection.
By default, all Windows operating systems use the TCP/IP protocol suite to communicate with each other through network devices. We'll look at this vital method of addressing computers on the next page.
By default, all Windows operating systems use the TCP/IP protocol suite to communicate with each other through network devices. Any computer network adaptor using TCP/IP requires 3 things to communicate with other computers: An IP address, a subnet mask for that IP address, and a default gateway. These terms will be defined in a moment. First, though, an idea of how a TCP/IP network works logically.
When you give a computer an IP address, you identify the network which it is a member of, and give it an identification number within that network. A computer in a given network can communicate with any other computer that is local to it (in the same network), provided there is a way for information to pass between them (network cables, wireless network, etc.).
Computers in a network cannot, however, communicate with computers in a different network (remote network) directly, even if they are physically connected to each other via cables.
This is where the default gateway comes in. A gateway is defined as a path out of the local network to other remote networks. A gateway can be a number of things physically, such as a DSL/cable router for your local network, a Windows server computer with multiple network adaptors split between different networks, etc. Gateways must all share one thing in common though. They are connected to at least 2 networks, and have the ability to pass traffic between them.
The default gateway assigned to a network adaptor is sent all traffic that does not belong in the local network. As an example of this, say you have a DSL Internet connection. When you connect to the Internet, you are provided with a default gateway assigned by your service provider. When you attempt to connect to a site on the Internet, the URL you type is converted into an IP address by your Internet provider.
Since this address is not going to be in your local network, the network adaptor in your computer forwards the request for the web page to its default gateway, your service provider.
From that point, your request will be passed from network to network through the internet until it reaches the local network and the data needed to display the web page starts its way back through the internet to your IP address.
That isn't where IP addresses stop, as you'll discover next.
Now granted, since windows 98 started the process, Microsoft's OSs have been getting progressively better at automating the process of connecting computers together, but there is still the external setup required, and if something goes wrong... well it's good to know where to look to fix it.
The purpose of this article is two-fold. First, to enable you to set up your own home network and share files between your computers, and second to make you comfortable with basic computer networking terminology and practice. Internet sharing deserves its own article, and so is not part of this one.
First, some important terms. Skip them if you know them.
Ethernet Network adaptor
An internal device that allows computers to communicate with each other via electrical signals passed through cable. Also known as a NIC (Network Interface Card).
Hub
An external device with multiple connections (ports). A computer attached to one port can communicate with computers attached to any of the other ports. They are available in many sizes, most commonly 5 ports.
Switch
Similar to a hub, but more efficient. While a hub will send data it receives from one port out all its other ports and let the computers attached to it figure out who the data is intended for, a switch stores information about the computers connected to it, then sends data only to the computer it is addressed to.
Firewall
A term for a software program or hardware device which can restrict specific kinds of data from passing into (or in some cases, out of) your network from the internet. Used for security purposes.
Cable/DSL router
Network devices which combine the functions of a switch and a firewall. They also provide the ability to easily share a DSL or cable Internet connection.
By default, all Windows operating systems use the TCP/IP protocol suite to communicate with each other through network devices. We'll look at this vital method of addressing computers on the next page.
By default, all Windows operating systems use the TCP/IP protocol suite to communicate with each other through network devices. Any computer network adaptor using TCP/IP requires 3 things to communicate with other computers: An IP address, a subnet mask for that IP address, and a default gateway. These terms will be defined in a moment. First, though, an idea of how a TCP/IP network works logically.
When you give a computer an IP address, you identify the network which it is a member of, and give it an identification number within that network. A computer in a given network can communicate with any other computer that is local to it (in the same network), provided there is a way for information to pass between them (network cables, wireless network, etc.).
Computers in a network cannot, however, communicate with computers in a different network (remote network) directly, even if they are physically connected to each other via cables.
This is where the default gateway comes in. A gateway is defined as a path out of the local network to other remote networks. A gateway can be a number of things physically, such as a DSL/cable router for your local network, a Windows server computer with multiple network adaptors split between different networks, etc. Gateways must all share one thing in common though. They are connected to at least 2 networks, and have the ability to pass traffic between them.
The default gateway assigned to a network adaptor is sent all traffic that does not belong in the local network. As an example of this, say you have a DSL Internet connection. When you connect to the Internet, you are provided with a default gateway assigned by your service provider. When you attempt to connect to a site on the Internet, the URL you type is converted into an IP address by your Internet provider.
Since this address is not going to be in your local network, the network adaptor in your computer forwards the request for the web page to its default gateway, your service provider.
From that point, your request will be passed from network to network through the internet until it reaches the local network and the data needed to display the web page starts its way back through the internet to your IP address.
That isn't where IP addresses stop, as you'll discover next.
Labels:
Computer Tips
Friday, October 26, 2007
Tweaking your windows settings
I hope these are a list of programs to help you mess around with you registry settings. Before you do anything remember these programs could really mess up your system and I don't want you complaining to me if you do. These programs are
1. For advanced users
2. People that know how to get themselves out of trouble when they do get themselves in trouble.
There is my disclaimer before you try any of these programs, so don't complain to me, because your pleas will fall on deaf ears. I'll try to help you if you screwed things up, but don't send me a bill. Now I'm not sure if I should even include this section...ahh what the heck, mayhem can be fun and it makes you grow as a person.
Fresh UI
This has lots of basic hacks that will make your system run a little more like you want it too. It's what I consider it a "safe" program. Has lots of things that you can change, you shouldn't get into trouble using this program. Lots of changes you can make to your system and you really don't have to worry about destroying your computer with it...it's also a freeware download, so no harm in downloading it and giving it a try.
Tweak UI
This is part of the Power Toys Microsoft puts out but doesn't really support. Basically Microsoft is saying, "Here's this program, it's cool, can do lots of stuff, but if you screw up don't come crying to us". There are two versions of this program, one for Win XP and one for Win 98, 95, ME...Download the right one.
These are the two programs I've tried, if you have any that you like just drop me an email and I'll check it out. I'll be writing registry hacks for this site where you go directly into regedit and do the changes yourself...but it's late tonight while I write this and I'll continue and add more as this website gets a little bit older and gets more visitors.
1. For advanced users
2. People that know how to get themselves out of trouble when they do get themselves in trouble.
There is my disclaimer before you try any of these programs, so don't complain to me, because your pleas will fall on deaf ears. I'll try to help you if you screwed things up, but don't send me a bill. Now I'm not sure if I should even include this section...ahh what the heck, mayhem can be fun and it makes you grow as a person.
Fresh UI
This has lots of basic hacks that will make your system run a little more like you want it too. It's what I consider it a "safe" program. Has lots of things that you can change, you shouldn't get into trouble using this program. Lots of changes you can make to your system and you really don't have to worry about destroying your computer with it...it's also a freeware download, so no harm in downloading it and giving it a try.
Tweak UI
This is part of the Power Toys Microsoft puts out but doesn't really support. Basically Microsoft is saying, "Here's this program, it's cool, can do lots of stuff, but if you screw up don't come crying to us". There are two versions of this program, one for Win XP and one for Win 98, 95, ME...Download the right one.
These are the two programs I've tried, if you have any that you like just drop me an email and I'll check it out. I'll be writing registry hacks for this site where you go directly into regedit and do the changes yourself...but it's late tonight while I write this and I'll continue and add more as this website gets a little bit older and gets more visitors.
Labels:
Computer Tips
Wednesday, October 24, 2007
Tips increasing system browsing
Another thing XP has changed is the way the folder icons look. It used to be small icons for the all the drives and the controll panel now it's made up of rather large icons that consume their fair share of the system resources.


Uncheck - Display file size information in folder tips
Uncheck - Display simple folder view of Explorer's Folders list
Check - Display the contens of system folders
Check - Display the full path in the address bar
Check - Display the full path in the title bar
Check - Do not cache thumbnails
Check - Show hidden files and folders
Uncheck - Hide extensions for know file types
Check - Hide protected operating system files (Recommended)
Uncheck - Launch folder windows in a seperate process
Uncheck - Remember each folder's view settings
Uncheck - Restore previous folder windows at logon
Check - Show control panel in My Computer
Check - SHow encrypted or compressed NTFS files in color
Uncheck - Show pop-up description for folder and desktop items
Check - Use simple file sharing

Now browsing through the Windows file system should be immensely faster.
- To prevent the large icons from taking up too much system resources start by clicking on the view button --> list

- Next click on the view button again --> status bar.

- Double click on my computer, a window will pop up, at the top of the window click on the tools button --> folder options.

- General tab, you won't need to do anything here.
- View tab, it's comprised of two sections, folder view and advanced settings. In the advanced sections area start by making sure you have the same settings as listed below,
Uncheck - Display file size information in folder tips
Uncheck - Display simple folder view of Explorer's Folders list
Check - Display the contens of system folders
Check - Display the full path in the address bar
Check - Display the full path in the title bar
Check - Do not cache thumbnails
Check - Show hidden files and folders
Uncheck - Hide extensions for know file types
Check - Hide protected operating system files (Recommended)
Uncheck - Launch folder windows in a seperate process
Uncheck - Remember each folder's view settings
Uncheck - Restore previous folder windows at logon
Check - Show control panel in My Computer
Check - SHow encrypted or compressed NTFS files in color
Uncheck - Show pop-up description for folder and desktop items
Check - Use simple file sharing
- After you're done checking and unchecking all of of those options, click on apply button at the bottom of the window, then at the top. Click on the "Apply to All Folders" button to apply the same settings to ALL windows folders. Click on the X to close the window. You won't need to do anything else on the other tabs.

Now browsing through the Windows file system should be immensely faster.
Labels:
Computer Tips
Tuesday, October 23, 2007
Clearing the file and URL history in Windows Media Player
When you play a file, link to the file is stored in the Windows Media Player history. To clear the file and URL history in Windows Media Player 10, use the following steps:
Labels:
Computer Tips
Disabling the Notification area Balloon tips
This article explains how to disable Notification Area balloon tips in Windows Vista.
Method 1
HKEY_CURRENT_USER\Software\Microsoft\Windows\CurrentVersion\Explorer\Advanced
This method applies to Windows XP as well.
Method 2
User Configuration \ Administrative Templates \ Start Menu and Taskbar
Here is the corresponding registry value for the above setting:
[HKEY_CURRENT_USER\Software\Microsoft\Windows\CurrentVersion\Policies\Explorer]
"TaskbarNoNotification"=dword:00000001
Sample Notification area balloon tip
Labels:
Computer Tips
Update Your Antivirus
As a new virus (on computer terms) appear, your antivirus program must know that one.
So basically, there are two update for your antivirus :
1. Update the engine (antivirus program).
2. Update the database of virus.
Some antivirus offering option to download/update online via internet. But how if you have many computer to proses ? Some provide an offline update files. Which you can copy/transfer and run on the other computer.
Here the list of link for download (offline prefered) update your antivirus. If you have other antivirus, please put it on the comment. NOTE , some will need your login/password/registration info.
AVG / Grisoft :
AVG Updates and Free version (free version)
Norton / Symantec :
http://securityresponse.symantec.com/avcenter/download/pages/US-N95.html
(beware the i-32 and x-86 version)
McAfee :
http://download.mcafee.com/updates/superDat.asp
!!! Do not download these updates if you are a subscriber of McAfee VirusScan or McAfee Personal Firewall. (Do no why they put it) because some said the new one, just update online.
Fprot :
http://www.f-prot.com/download/home_user/
http://updates.f-prot.com/cgi-bin/get_randomly?fp-def
http://updates.f-prot.com/cgi-bin/get_randomly?macrdef2
Check also :
F-PROT for DOS Info
Clamav :
/usr/local/bin/freshclam –quiet -l /var/log/clam-update.log
Copy the data files to other pc.
Antivir / Free-av :
http://www.free-av.com/antivirclassic/vdfdown.html
Avast! :
http://www.avast.com/eng/updates.html
Platinum / Panda :
http://www.pandasoftware.com/download/Client+Zone/
Norman : must online
NOD :
Tequilla_boyz point to
http://download.paipai.net/texts/components.htm
So basically, there are two update for your antivirus :
1. Update the engine (antivirus program).
2. Update the database of virus.
Some antivirus offering option to download/update online via internet. But how if you have many computer to proses ? Some provide an offline update files. Which you can copy/transfer and run on the other computer.
Here the list of link for download (offline prefered) update your antivirus. If you have other antivirus, please put it on the comment. NOTE , some will need your login/password/registration info.
AVG / Grisoft :
AVG Updates and Free version (free version)
Norton / Symantec :
http://securityresponse.symantec.com/avcenter/download/pages/US-N95.html
(beware the i-32 and x-86 version)
McAfee :
http://download.mcafee.com/updates/superDat.asp
!!! Do not download these updates if you are a subscriber of McAfee VirusScan or McAfee Personal Firewall. (Do no why they put it) because some said the new one, just update online.
Fprot :
http://www.f-prot.com/download/home_user/
http://updates.f-prot.com/cgi-bin/get_randomly?fp-def
http://updates.f-prot.com/cgi-bin/get_randomly?macrdef2
Check also :
F-PROT for DOS Info
Clamav :
/usr/local/bin/freshclam –quiet -l /var/log/clam-update.log
Copy the data files to other pc.
Antivir / Free-av :
http://www.free-av.com/antivirclassic/vdfdown.html
Avast! :
http://www.avast.com/eng/updates.html
Platinum / Panda :
http://www.pandasoftware.com/download/Client+Zone/
Norman : must online
NOD :
Tequilla_boyz point to
http://download.paipai.net/texts/components.htm
Labels:
Computer Tips
Sunday, October 21, 2007
Tips system restore for WinXP
Windows XP when it was first released had such a positive buzzzzzz around it that you thought it would be able to leap small buildings in a single bound, that it would be able to run faster than a locomotive, that it would have a girlfriend named Lois!!!! Once you installed XP it basically looks like a fancy version of Windows 98...alright so you don't know what's so good about it and I remember the first day I installed XP I stopped and thought, "This is what everyone was screaming about?" It took me a week before I started to see what was so great about Windows XP and I think that the best feature in Windows XP would be the System Restore function.
Most Windows XP users probably haven't had the opportunity to try System Restore, or for that matter, they probably didn't even realize Windows XP came with such a function. So, what is System Restore? Basically it's a time machine for you computer. Let me explain, say your computer was working just fine a few days ago, but alas today it doesn't work at all...could it have been that download you installed? EGAD, what can you do to fix this...well you use System Restore. Basically System Restore takes a daily snapshot of your computer and stores it there. If your computer should suddenly not work one day all you have to do is go to System Restore and pick a day or a restore point for your computer (basically a day where your computer was working) and then the computer will reboot and be like new again or at least like a day ago when it was working. So, here's what you do:
Go to Start-->All Programs-->Accessories-->System Tools-->System Restore
Once you do this it will open up program that looks like this:
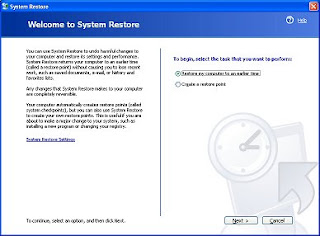
There will be two options on this first page:
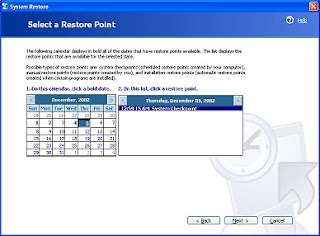
Oh so cool, a calendar, yes that has a listing of all the restore points, basically you can restore your computer to weeks earlier, but I don't recommend that, especially if you've installed a lot of software in that time. Basically pick a day or two before, this will get you back to a working computer without having the hassle of installing lots of software again. Then you click Next...it will ask you if you want to restore and then it will reboot your computer...once your computer reboots it will be rebooting to what your computer looked like a few days ago. There you have it!!! Now isn't that cool? I mean if there is any feature that I tell people about XP it's the System Restore function. I've used it once already after I installed some flaky software a friend recommended, ughhh, but System Restore had me smiling in just one reboot.
Most Windows XP users probably haven't had the opportunity to try System Restore, or for that matter, they probably didn't even realize Windows XP came with such a function. So, what is System Restore? Basically it's a time machine for you computer. Let me explain, say your computer was working just fine a few days ago, but alas today it doesn't work at all...could it have been that download you installed? EGAD, what can you do to fix this...well you use System Restore. Basically System Restore takes a daily snapshot of your computer and stores it there. If your computer should suddenly not work one day all you have to do is go to System Restore and pick a day or a restore point for your computer (basically a day where your computer was working) and then the computer will reboot and be like new again or at least like a day ago when it was working. So, here's what you do:
Go to Start-->All Programs-->Accessories-->System Tools-->System Restore
Once you do this it will open up program that looks like this:

There will be two options on this first page:
- Restore my computer to an earlier time
- Create a restore point

Oh so cool, a calendar, yes that has a listing of all the restore points, basically you can restore your computer to weeks earlier, but I don't recommend that, especially if you've installed a lot of software in that time. Basically pick a day or two before, this will get you back to a working computer without having the hassle of installing lots of software again. Then you click Next...it will ask you if you want to restore and then it will reboot your computer...once your computer reboots it will be rebooting to what your computer looked like a few days ago. There you have it!!! Now isn't that cool? I mean if there is any feature that I tell people about XP it's the System Restore function. I've used it once already after I installed some flaky software a friend recommended, ughhh, but System Restore had me smiling in just one reboot.
Labels:
Computer Tips
Monday, October 15, 2007
Compress Files
Some files can be too big to be quickly transferred across the Internet or between PCs. This guide describes how to use the WinZip program to compress files for easier transfer and storage.
Installing WinZip
You can download a trial version of WinZip from www.winzip.com
After the trial period is over you will be reminded to purchase a License to continue using the program.
Choose a site to download from and click Download Now. Choose to Save To Disk and choose a location on your computer to save to.
Double-click the winzip file you have downloaded to begin installation. Click Setup then OK to install to your Program Files folder. As you proceed through the setup options you will need to click Next to move on to the next screen.
Click Yes to agree to the License Agreement. You can now view or print a Quick Start guide if you wish to. Choose Start with the WinZip Wizard.
Choose Quick Search and after a few seconds WinZip will finish making a list of your folders. The setup will also need to associate WinZip with various filetypes. When WinZip Setup has finished, click Close.
Using WinZip
To start the program, double-click the WinZip shortcut on your desktop, or alternatively click on the Start menu then All Programs > WinZip > WinZip.exe.
Click on Use Evaluation Version. You should now see the WinZip Wizard, which helps you perform the most common tasks associated with WinZip. Click Next and for this example, Create A New Zip File.
Choose a filename such as "ZipTest" which will be saved to the default folder, or use Browse to choose a different folder, enter the filename and click OK.
Click Next. Use the Add Files button to add the files you want to compress, or you can click and drag them into the empty box. When you have added the file or files you want to compress into this Zip file, click ZipNow then Finish.
WinZip will close and if you now look in My Documents or whichever folder you specified earlier, you should see a .zip file called "ZipTest". To open this or any other Zip file, in Windows XP you can double-click it as if it were a normal folder. From here you can drag the files out, which will extract them so they can be used as normal.
Alternatively, right-click the file and choose Open With WinZip. Click Evaluation Version and you should see the Wizard again.
Click Next then UnZip or Install from "ZipTest.zip". Click Next and choose a folder to extract the contents of the Zip file to (the default location is a folder called Unzipped in My Documents).
Click Unzip Now. In the folder you specified you should now be able to see the files you originally compressed in the Zip file, extracted and ready to use again. Click Finish in WinZip to close the program.
Labels:
Computer Tips
My best removing Spyware, Adware and Malware tools
If you have been on the Internet for any length of time, you've probably ran across the topic of spyware, adware, or malware. This is software that has installed on your computer, many times without your permission, or accidentally by clicking on a popup ad, etc. The problem with these programs is they will slow your computer down, make changes to your desktop, homepage, search page, load programs into your taskbar tray and otherwise get in the way. In the worst cases, they will even transmit information from your computer to servers on the Internet.
So the question becomes, if your computer is infected with these problematic programs, how do you get rid of them. In most cases, you can run a free removal program to remove these infections, in more serious cases, you may have to download a specialized removal program to free yourself of these problems.
Listed below you will find the best freeware programs available on the Internet for removing spyware, adware, and malware:
Adware and Spyware Removal
Lavasoft Ad-Aware 2007 7.0.2.3
Spybot - Search and Destroy 1.5
Microsoft Windows Defender
a² (a-squared) Scanner
Preventing the Installation of Adware and Spyware
SpywareBlaster 3.5.1
SpywareGuard 2.2
Specialized Removal Programs
CWShredder 2.19 - CoolWebSearch Removal Tool from Trend Micro
EliteToolbar Remover V.2.1.2
Incredifind and PerfectNav Uninstaller
Kill2Me - Removal of Look2Me infections
Lop.com Uninstaller
OmegaKiller for removing hijackers
VX2.BetterInternet for XP/2000 for Removing Look2Me
WildTangent Remover
Programs to Delete Undeletable Files
Pocket Killbox
Remove on Reboot Shell Extension
Unlocker
Helpful Tools for Investigating Adware and Spyware Infections
HijackThis 1.99.1 by Merijn
SysInternals Process Explorer
Sysinterals RootkitRevealer
Online Virus Checkers
Trend Micro Housecall - will scan and remove threats
BitDefender Scan Online - will scan and remove threats
Ewido Online Scanner - (Now AVG) will scan and remove threats
F-Secure Online Scanner - will scan for rootkits as well
Kaspersky Online Scanner - appears to only scan for but not remove threats
Panda Activescan - appears to only scan for but not remove threats
McAfee FreeScan - appears to only scan for but not remove threats
eTrust Antivirus Web Scanner - will scan and remove threats
Symantec Security Check - will scan and remove threats
Dr.Web Online Check - user can upload and test for threats on particular files
Trojan Scanner
TrojanScan by WindowsSecurity.com
Free Antivirus Programs to Download
ANTI-VIR
AVAST
AVG
TCP/IP and Winsock Repair Utilities for Windows XP and 2000
LSPFix by Cexx.org
Winsock XP Fix
XP TCP/IP Repair utility
Labels:
Computer Tips
Clean Out And Clean Up Files
The more you use your PC, the more it will collect junk files that you no longer need, taking up unnecessary disk space. It is therefore a good idea to regularly clean out your system, getting rid of the files you no longer need to make space for new ones.
You can also run maintenance programs which can 'defrag' your files – in other words clean up and arrange them in a way which makes it easier for your PC to find. By doing this, you can improve the speed at which Windows runs programs.
The Recycle Bin
When you delete a file, usually this just means it has been moved to the Recycle Bin. If you do not regularly empty your Bin, the files inside may take up valuable disk space.
Double click the Recycle Bin icon on your desktop to see which files are currently stored in there. If there are any files in the Bin that you want to keep and put back in the original place you deleted them from, right-click on the files and select Restore. If you are happy you no longer require any of the files in the Recycle Bin, you can remove them from your computer completely by right-clicking the Recycle Bin icon and selecting Empty recycle bin.
You should empty your Recycle Bin regularly, at least once a week.
Remove Temporary Files
Temporary or junk files are left over by programs and are usually no longer needed. They waste space and that may eventually slow your PC down.
Internet Explorer stores many of the files used on the web pages you visit so that next time you go to a site it doesn’t have to download the same files again. However, this can build up over time and take up a lot of disk space.
In Internet Explorer 6 click on Tools then Internet Options. Under the section Temporary Internet Files on the General tab, click Delete Files. Tick Delete all offline content and click OK. When finished, click OK to exit the Internet Options window.
In Internet Explorer 7 click on Tools then Internet Options and look for the section Browsing History and click the Delete button underneath. Next Click the Delete Files button next to Temporary.
The System Restore facility is a useful safety feature but it can also use up a lot of space, so occasionally it is worth clearing out the old restore points.
To do this, go to Control Panel, click on System then on the System Restore tab. Tick to turn off System Restore and click Apply, this will clear out all old restore points. Now un-tick to turn System Restore back on and use the slider to specify the amount of disk space you want it to use for future restore points.
Disk Cleanup
The Disk Cleanup system tool allows you to clean out Windows components and programs you no longer need, and remove temporary files.
From the Start menu, click on Programs> Accessories> SystemTools> Disk Cleanup.
The main Disk Cleanup window shows two tabs - Disk Cleanup and More Options. In the Disk Cleanup tab window, put a tick in the following boxes if you wish to clean out these unnecessary files:
- Downloaded program files
- Temporary internet files
- Recycle bin
- Temporary files
Click on the More Options tab and you can choose to get rid of unwanted Windows components, remove installed programs you no longer use, and remove all but the most recent System restore point.
When you have selected everything you want to clean up, click on OK then Yes to confirm you want to begin the Disk Cleanup process.
Defragmenting Your Hard Disk
Disk Defragmenter helps Windows arrange files on your Hard Disk in a way that makes it easier and faster for it to find your programs.
From the Start menu, click on Programs> Accessories> SystemTools> Disk Defragmenter.
It is recommended that you read the Defragmenter Help manual before beginning the defragmentation process. Click on Help from the menu at the top of the Disk Defragmenter window.
Defragmenting can take anything from a few minutes to several hours depending how fragmented the disk is, during which time you should not run any other programs.
Disk Defragmenter requires 15% of free space on your hard disk to work with. If you do not have enough space you will need to delete some files. To start the defragmentation process, click the volume that you want to defragment, and then click Defragment.
Labels:
Computer Tips
Check For Viruses
If you suspect you have a virus on your computer, or if you just want to keep your computer safe from the threat of viruses, there are several virus-detection programs which will scan your system and let you know if any malicious programs have been found.
There are many commercial and free anti-virus programs available on the Web, all with different features and levels of security. This tutorial uses AVG Anti-Virus.
Download AVG Anti-Virus Free Edition
AVG Anti-Virus can be downloaded from http://free.grisoft.com.
Scroll down the page and click Download Free Version. Under the Windows section, click to download the file under AVG Free for Windows installation files. Click OK to save the file to your PC.
Install And Run AVG Anti-Virus
Double-click the file you downloaded, and click Next on the welcome screen. Click Accept to agree to the License Agreement. Choose Standard Installation then click Next.
The Confirmation screen will now appear with your User Name and License Number. Click Next to proceed. Click Finish to begin installation.
After installation is complete, click OK. The main AVG Control Center will now start. On the First Run screen that pops up, click Next. Click Check For Updates and then Internet which will download any necessary files to bring your AVG up to the latest version.
A window will now pop-up if there are any available updates. Click Update to download them. AVG will download and automatically install any updates. Click OK when finished.
Back on the First Run window, click Next to proceed. Leave the Daily Scanning settings as they are and click Next.
You now have the option to perform a scan to test your computer for viruses. Click Scan computer! or just click Next if you want to proceed with setting up AVG.
If you wish, you can now register your copy of AVG to receive news and product information. Otherwise, click Next and then Continue.
AVG Test Center
Here you can see your Security Status, and choose to perform scans on your whole computer or selected areas only.
When you run a complete scan, it may take a while depending on the size of your hard drive. It will scan your system for any viruses and if it finds any, it will pop up a window to inform you what action it has taken.
If possible the program will try to 'heal' any infected files, or if it is unable to clean these files it may move them to its Virus Vault, where the infected files are kept in a state where they will not be able to harm your computer, but can be retrieved later if necessary.
The AVG Anti-Virus program contains several tools which continuously monitor your system, but it is recommended that you run a complete scan of your computer regularly, at least once a month to check your computer for any infected files.
If you do not want to run a scan now, just click the Close (X) button at the top-right of the AVG window. This does not in fact stop the AVG program running, it just closes the windows so you can get on with using your PC.
Using The AVG Icon
You can tell if AVG is running as a small coloured icon will be displayed on your taskbar.
If you right-click the AVG taskbar icon you can restore the Control Center and Test Center windows. You can also perform a manual Check For Updates from this menu.
AVG will quietly monitor your PC and check for viruses while you continue using your PC. It will start automatically when you first turn on your PC and check for any updates when you connect to the Internet.
If you need to stop AVG running for any reason, right-click the taskbar icon and choose Quit AVG Control Center.
To start AVG, click the Start menu then All Programs. Click AVG Free Edition and choose AVG Control Center.
Labels:
Computer Tips
Friday, October 12, 2007
Keyboard Shortcuts
A list of key combinations that can be used to perform special functions. By pressing or holding certain keyboard buttons together you can launch new windows, create shortcuts, and quickly copy and paste file.
Windows key - access Start menu
Windows key + Pause- open System Properties
Windows key + D- minimise/restore windows
Windows key + F- open Search window
Windows key + F1- open Help and Support Center
Windows key + E- open Windows Explorer window
Windows key + M- minimise all windows
Windows key + TAB- move through open windows on Taskbar
Windows key + SHIFT + M- restore all windows
Hold CTRL while dragging - make a copy of selected item
Hold CTRL + SHIFT while dragging - make a shortcut to selected item
CTRL + ESC - open Start menu
CTRL + C - Copy
CTRL + X - Cut
CTRL + V - Paste
CTRL + A - Select All
CTRL + Z - Undo
CTRL + B - Bold highlighted text
CTRL + U - Underline highlighted text
CTRL + I - Italicise highlighted text
CTRL + Plus key - increase browser text size
CTRL + Minus key - decrease browser text size
CTRL + ALT + DELETE - open Task Manager
ALT + underlined letters in menus - open menu item
ALT + ENTER - show Properties of selected object
ALT + F4 - close current window or program
CTRL + F4 - close window within program
ALT + TAB - switch between open windows or programs
TAB - move forwards through control items or links in current window
SHIFT + TAB - move backwards through control items or links
ENTER - click selected control item or link
BACKSPACE - move up one folder level
HOME - go to start of current line or web page
END - go to end of current line or web page
CTRL + END - go to end of current document
PAGE UP - move up through current document or web page
PAGE DOWN - move down through current document or web page
PRINT SCREEN - take snapshot image of current screen
ALT + PRINT SCREEN - take snapshot image of current window
F2 - rename selected item
F5 - refresh current window or web page
F6 - move through window panes
Labels:
Computer Tips
Subscribe to:
Posts (Atom)


 Health


